「ラズパイと 3.2 インチタッチパネル付き液晶」の続き。タッチパネルを使ってみた。ググってみると、X window で使う方法はすぐに出てくるのだが、X なしで使う方法を探し出すのに少し手間取った。
タッチパネルのドライバは Linux Input Subsystem 経由でアクセスできる。次のようにすると、利用できるデバイスの一覧が取得できる。最初の2つが USB キーボード、3つめがタッチパネル。
pi@raspberrypi:~ $ cat /proc/bus/input/devices
I: Bus=0003 Vendor=1c4f Product=0027 Version=0110
N: Name="SIGMACHIP USB Keyboard"
P: Phys=usb-20980000.usb-1/input0
S: Sysfs=/devices/platform/soc/20980000.usb/usb1/1-1/1-1:1.0/0003:1C4F:0027.0001/input/input0
U: Uniq=
H: Handlers=sysrq kbd leds event0
B: PROP=0
B: EV=120013
B: KEY=10000 7 ff800000 7ff febeffdf f3cfffff ffffffff fffffffe
B: MSC=10
B: LED=7

I: Bus=0003 Vendor=1c4f Product=0027 Version=0110
N: Name="SIGMACHIP USB Keyboard"
P: Phys=usb-20980000.usb-1/input1
S: Sysfs=/devices/platform/soc/20980000.usb/usb1/1-1/1-1:1.1/0003:1C4F:0027.0002/input/input1
U: Uniq=
H: Handlers=kbd event1
B: PROP=0
B: EV=1f
B: KEY=3007f 0 0 0 0 483ffff 17aff32d bf544446 0 0 1 130c13 b17c000 267bfa d941dfed 9e1680 4400 0 10000002
B: REL=40
B: ABS=1 0
B: MSC=10

I: Bus=0000 Vendor=0000 Product=0000 Version=0000
N: Name="ADS7846 Touchscreen"
P: Phys=spi0.1/input0
S: Sysfs=/devices/platform/soc/20204000.spi/spi_master/spi0/spi0.1/input/input2
U: Uniq=
H: Handlers=mouse0 event2
B: PROP=0
B: EV=b
B: KEY=400 0 0 0 0 0 0 0 0 0 0
B: ABS=1000003
コーディングは、"Programming for a Touchscreen on the Raspberry Pi" を参考にした。
まず、タッチパネルのデバイスをオープンする。/dev/input/event* を順に調べて、デバイス名に "Touchscreen" があるものを探す。デバイス名は当然機種依存なので、個別に調査が必要。
static int16_t s_fd = 0;
static int
l_tp_open(lua_State *L, int in_calibration)
{
  char dname[20];
  char name[256] = "Unknown";
  int i;
  if (s_fd == 0) {
    for (i = 0; i < 10; i++) {
      snprintf(dname, sizeof(dname), "/dev/input/event%d", i);
      if ((s_fd = open(dname, O_RDONLY)) < 0)
        continue;
      ioctl(s_fd, EVIOCGNAME(sizeof(name)), name);
      if (strstr(name, "Touchscreen") != NULL)
        break;
      close(s_fd);
      s_fd = -1;
    }
    if (s_fd > 0) {
      /*  Read the configuration data if present  */
      ...
    }
  }
  return s_fd;
}
イベントを取得する。今回使ったタッチパネルは、X 方向のノイズがひどかったので、フィルタをかける必要があった。また、値が 10 以上変化しなかった場合は無視している。このあたりの設定は、若干の試行錯誤が必要。たぶん、個体差もあると思う。
/*  getevent() -> (type, x, y, pressure)  */
/*  type = nil: no input, 1: start touch, 2: drag, 3: end touch  */
int
l_tp_getevent(lua_State *L)
{
  int n, x, y;
  static int s_state = 0, s_x, s_y, s_p, s_count;
  static int s_x0, s_y0, s_p0;
  static int s_xlast, s_ylast;
  if (l_tp_open(L, 0) <= 0)
    return 0;
  while (1) {
    struct pollfd pfd;
    struct input_event ev;
    pfd.fd = s_fd;
    pfd.events = POLLIN;
    pfd.revents = 0;
    n = poll(&pfd, 1, 0);
    if (n < 0)
      return luaL_error(L, "Touchpanel error: poll() failed");
    else if (n == 0)
      return 0;  /*  No input  */
    n = read(s_fd, &ev, sizeof(ev));
    if (n < sizeof(ev))
      return luaL_error(L, "Touchpanel error: read() failed");
    if (ev.type == EV_KEY && ev.code == BTN_TOUCH) {
      if (ev.value == 1) {
        s_state = 1;  /*  Touch start  */
        s_x0 = s_y0 = s_p0 = 0;
        s_count = 0;
      } else {
        s_state = 0;  /*  Touch end  */
        l_tp_convert(s_x0, s_y0, &x, &y);
        lua_pushinteger(L, 3);
        lua_pushinteger(L, x);
        lua_pushinteger(L, y);
        lua_pushinteger(L, s_p);
        return 4;
      }
    } else if (ev.type == EV_ABS) {
      if (ev.code == ABS_X)
        s_x = ev.value;
      else if (ev.code == ABS_Y)
        s_y = ev.value;
      else if (ev.code == ABS_PRESSURE) {
        s_p = ev.value;
        if (s_count == 0) {
          s_x0 = s_x;
          s_y0 = s_y;
          s_p0 = s_p;
        } else {
          /*  Filter sudden noise  */
          s_x0 = (int)(s_x0 * 0.9 + s_x * 0.1);
          s_y0 = (int)(s_y0 * 0.9 + s_y * 0.1);
          s_p0 = (int)(s_p0 * 0.9 + s_p * 0.1);
        }
        s_count++;
        l_tp_convert(s_x0, s_y0, &x, &y);
        if (s_state == 2) {
          /*  If the position is too close, then do not invoke drag event  */
          int dx = s_xlast - s_x0;
          int dy = s_ylast - s_y0;
          const int lim = 10;
          if (dx < lim && dx > -lim && dy < lim && dy > -lim)
            return 0;
        }
        s_xlast = s_x0;
        s_ylast = s_y0;
        lua_pushinteger(L, (s_state == 0 ? 1 : s_state));
        lua_pushinteger(L, x);
        lua_pushinteger(L, y);
        lua_pushinteger(L, s_p);
        if (s_state == 0 || s_state == 1)
          s_state = 2;  /*  The next event will be 'drag'  */
        return 4;
      }
    }
  }
}
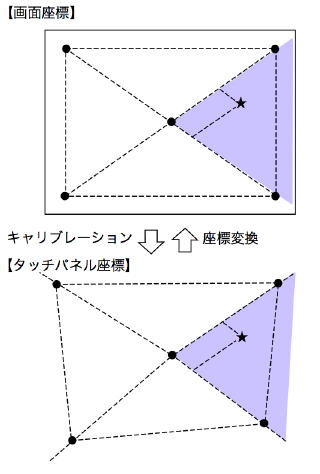
タッチパネルのキャリブレーションのために、中央と四隅に印を出してその位置をタップする。タップ位置を画面座標に変換するには、下図のように中央を頂点とする三角形でタップ位置を含むものを選び、その中で一次変換を行う。3.2 インチ程度の小さなパネルであれば、このような5点のキャリブレーションで十分実用になる。
コードはこんな感じ。
static int16_t *s_calib_coords;
static int16_t s_calib_npoints;
static void
l_tp_convert(int si, int ti, int *xi, int *yi)
{
  float s, t, s0, t0, s1, t1, s2, t2;
  float x0, y0, x1, y1, x2, y2;
  float v, w;
  float d;
  int i;
  s0 = s_calib_coords[0];
  t0 = s_calib_coords[1];
  x0 = s_calib_coords[2];
  y0 = s_calib_coords[3];
  s = si - s0;
  t = ti - t0;
  for (i = 1; i < s_calib_npoints; i++) {
    int n = i * 4;
    s1 = s_calib_coords[n++] - s0;
    t1 = s_calib_coords[n++] - t0;
    x1 = s_calib_coords[n++] - x0;
    y1 = s_calib_coords[n++] - y0;
    if (i == s_calib_npoints - 1)
      n = 4;
    s2 = s_calib_coords[n++] - s0;
    t2 = s_calib_coords[n++] - t0;
    x2 = s_calib_coords[n++] - x0;
    y2 = s_calib_coords[n++] - y0;
    d = 1.0 / (s1 * t2 - s2 * t1);
    s1 *= d;
    s2 *= d;
    t1 *= d;
    t2 *= d;
    v = t2 * s - s2 * t;
    w = s1 * t - t1 * s;
    if (v >= 0.0 && w >= 0.0) {
      *xi = (int)(x1 * v + x2 * w + x0);
      *yi = (int)(y1 * v + y2 * w + y0);
      return;
    }
  }
}
Lua のライブラリとして実装して、テストプログラムを書いてみた。
gcolor(rgb(1, 1, 1))
xx = 0
yy = 0
while true do
  st, x, y, p = tp.getevent()
  if st == 1 or st == 2 then
    locate(0, 0); clearline()
    print(st, x, y, p)
  end
  if st == 1 then
    xx = x
    yy = y
  elseif st == 2 then
    line(xx, yy, x, y)
    xx = x
    yy = y
  else
    if inkey(1) == 27 then break end
  end
end
GitHub に公開しました。→ https://github.com/toshinagata/luaconsole
